I do have a couple tiny disclaimers to point out before we dig into the nerdy bits of this tutorial.
Increasing your media upload size does have consequences for your site speed. If you are uploading giant files (like video or huge graphics), you will slow your site down. Be mindful as to how much you increase your limit by + the types of files you are uploading.
This may not work for your site because of your hosting company. It’s worth trying, but keep in mind that this is not a guaranteed fix.
Whew, now that that’s out of the way, let’s dive into the nerdiest tutorial in tiny blue orange history!
Out of the box, the maximum upload file size in WordPress isn’t very large. That’s to help keep your site fast (cause fast sites are a good thing). Some hosting companies will even increase the limit for you, without you even needing to ask them, to a limit that still allows your site to be fast.
But if you find yourself staring at a file upload error, that means you’re going to need to head into your server files + make a few small changes. don’t worry, it’s not that scary!
php.ini
The first thing you need to determine is if you already have a php.ini file OR if you need to create one.
Start by logging into your hosting account + heading to your File Manager (or logging into your site via FTP if you are comfortable with that already). In your primary site folder, you will want to see the following folders
- wp-admin
- wp-content
- wp-includes
If you see those 3 folders (among other folders + files), you’re in the right spot. Look for a file named php.ini — if it’s not there skip to the creation step, otherwise follow the editing steps.
Edit php.ini
Edit your existing php.ini file in File Manager or by downloading it within your FTP tool. Then do a search for the term upload_max_filesize.
This line of code tells your site what the maximum upload file size should be — in the screenshot above you would see upload_max_filesize = 10M within the php.ini file.
Change the 10M (or whatever your number is) to something like 64M or even 128M, depending on how ok you are with slowing your site down. (The bigger the number, the larger the file, the slower your site could get.)
Then you are going to do the same thing for the term post_max_size. set it to the same number you set upload_max_filesize to.
Save your changes + you’re done!
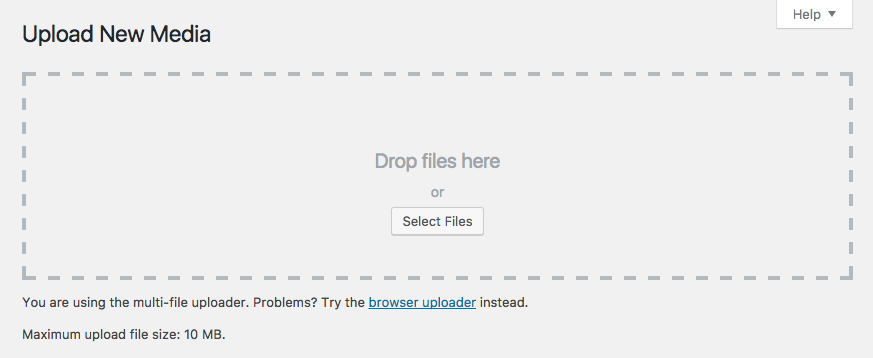
Now go to your WordPress dashboard, then Media > Add New. If you saved your changes properly, you will now see your number next to the Maximum upload file size details below the uploads box.
Create php.ini
To create a file, simply use the File Manager add icon (or right click to create a new file with your FTP tool) + name it php.ini — that’s it.
Then open the file + paste in the following code
upload_max_filesize = 64M
post_max_size = 64M
max_execution_time = 300
Note: you can change the 64M to 128M if you’re ok with larger files on your site + server. If you do, make sure to change it for both instances — upload_max_filesize + post_max_size.
Save your changes + you’re done!
Now go to your WordPress dashboard, then Media > Add New. If you created your new file in the right place, you will now see your number next to the Maximum upload file size details below the uploads box.