Whether you’ve heard horror stories of websites getting hacked, or you’re simply looking to step up your online security, this option is one of the easiest. When you add two-factor authentication to WordPress, it makes the simple login screen much harder to break into. And that means one less spot for folks to gain access to your business or blog.
What is Two-Factor Authentication?
You’ll see two-factor authentication written a few ways — it could also be 2-factor authentication or 2FA because we loooooove acronyms in tech. No matter how you write it, 2FA is an extra layer of security.
Instead of a password being the authentication to access a site, another piece of info is required. This might be an answer to a security question, a face scan or fingerprint, or a 6 digit code that changes every 30 seconds to 4 minutes depending on your settings. We’re going to use that last one to secure your WordPress site.
This way if someone guesses your password, they would also need your phone to sign into your website. If you’ve lost both your passwords + your phone, grab some experts to help.
How to add two-factor authentication to WordPress
In order to add 2FA to your site, you’ll need 2 things (so punny). You’ll need a plugin installed on your site + an app installed on your phone. If you have multiple sites, the great news is that you’ll access the same app on your phone for all of your sites.
Start by installing the app on your phone
- Either search Google Authenticator in the App Store or via Google Play.
- Install the app as you would any other app on your phone.
- You’ll need the QR code from your site, so leave the app alone for now.
Then add two-factor authentication to WordPress
- Log into your WordPress site + navigate to Plugins > Add New.
- Search for Google Authenticator (this is the easiest-to-use 2FA plugin I’ve found).
- Install + activate the plugin on your site.
- Go to Users > Profile to create a description — I like to use the site title or domain name.
- Go back to your phone + the screen that asks for a QR code to scan. Scan the code the plugin is showing you. If you don’t see it, click the “Show/Hide QR Code” button.
- On your computer, click the Update profile at the bottom of the website page to save your changes.
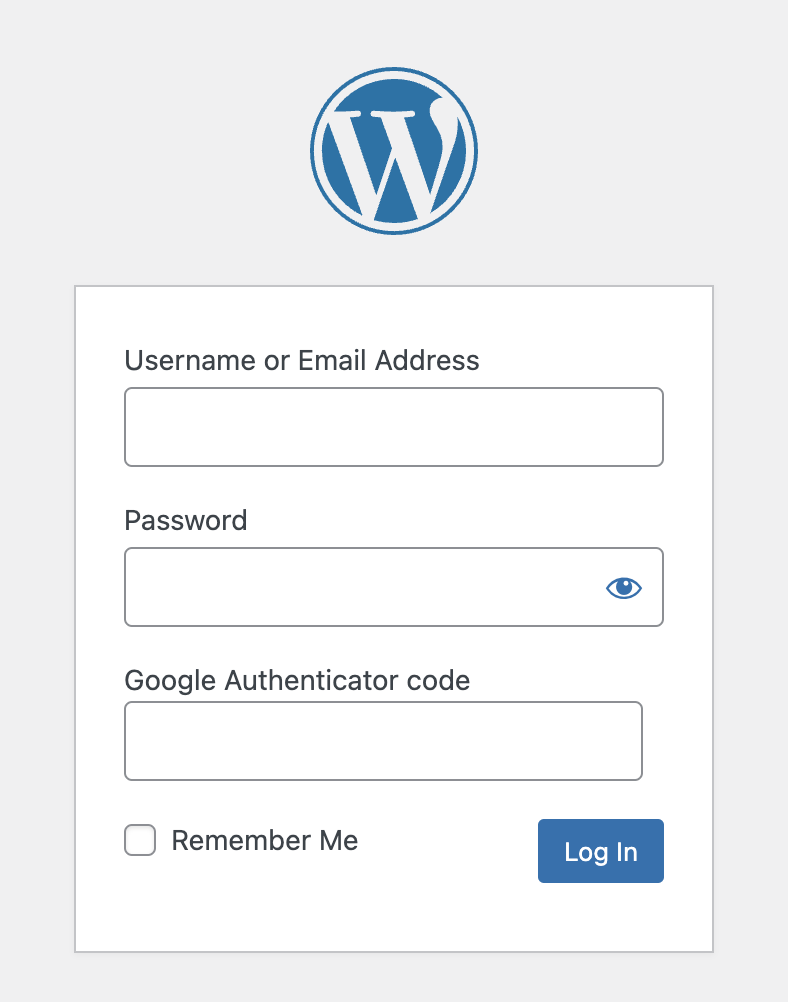
The next time you log in, you’ll open Google Authenticator on your phone + type in the 6 digit code after your username + password.
Optional — require other users to use 2FA
I’ve said it before + I’ll say it again… you’re only as secure as your weakest link. Which is why it’s a great idea to have all administrator users on your site use 2FA, not just you. And if you’re the only admin account, you might want to make a second one.
Head to your users list (Users > All Users). You’ll need to edit each user individually by clicking on their username. At the bottom of the editor, you’ll see the option to “Hide settings from user” if you’d like. Roles like Editor, Author or Subscriber don’t need as much security as Administrator. Which is why you may want an Editor account to log in with when making simple content changes.
Share this post or the instructions above with those users before adding the plugin.