If you make changes to your WordPress site content, you’ll likely need to create a redirect. Redirects help you avoid broken links, aka traffic landing on a dead end on your site. The good news is that they are really simple to set up + you can do so right in your site dashboard.
Install a redirect plugin
When you’re ready to create your redirect in WordPress, you’ll want to start with installing a redirection plugin. There are 3 that I recommend for clients
- Redirection: This free plugin is easy to use + provides all of the features you’ll need to set up multiple redirects.
- Quick Page/Post Redirect: This free plugin is almost painfully simple. It does not have some of the features that the first plugin does — but you might not need those features.
- Yoast SEO Premium: If you’re using Yoast SEO + making the most of it, you might consider paying for the premium version + avoiding the need for yet another plugin.
The benefits + uses of redirects
Since I’m a big fan of dishing out information that is useful to you, there are lots of ways that you can use redirects to improve your online business. Let’s say you’re working on your customer aquisition + change a few blog post URLs. You don’t want to lose any traffic you’d get from the old link being shared on social media, right? There’s no need to worry about that with redirects.
Another great use is avoiding crazy long URLs that you want to share with others. A URL shortener is another option, but it doesn’t give you the chance to create an easy to remember URL. Your link could go from http://slightlylongdomain.com/services/coaching/business-coaching/ to http://slightlylongdomain.com/biz-coach/.
You can also use redirects to make someone feel special. If you have a high-level service offering that you want to personally share with some important people, send them a note or letter with the details + at the bottom you could put http://yourdomain.com/theirname. As long as you created a redirect to forward that URL to a page that exists on your site, they will get the details in a fun + special way.
Redirects can also link your clients to another site, like your Zoom meeting room or private Facebook group.
Create your redirect
With your plugin active, you’ll need to know 2 things to create your redirect — the old URL + the new one. Another way of thinking about it is that you’ll be telling traffic to go over here instead of over there.
Using Redirection
Click on Tools > Redirection in your left hand menu. You’ll see an “Add New” button that will set up your first redirect. Don’t worry about the settings + options, we’ll walk through them now.
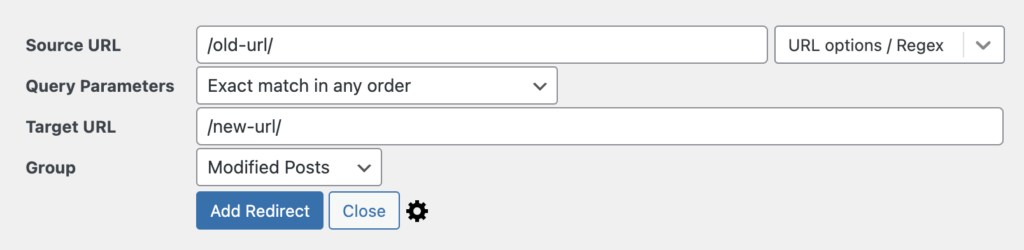
The Source URL is your old URL + the Target URL is your new one. If you’re keeping traffic on your site, you can skip your .com + start right with the / like I’ve done in the image above.
What about the settings? Here’s my advice:
- Under URL options, select ignore case + ignore slash. WordPress automatically applies a / at the end of every link, but sometimes we, as site owners, forget to include that link in social share posts. Ignoring the slash will catch both variations.
- Under Query Parameters, select Ignore & pass parameters to the target. Why? If you share your content on Facebook at all, you’ll need this selected for the redirect to work. Same goes for any other site that adds extra content to links.
- Group is really personal preference. You can create groups with this plugin + then place your various redirects into those groups to keep them organized. It’s not required, but it can be handy!
From there, click Add Redirect + your brand new redirect should be working within minutes.
The thing I really like about this plugin is that you can edit, pause, or delete any redirects. That’s a great feature for folks using redirects to open or close a shopping cart.
Using Quick Page/Post Redirect
Click on Quick Redirects in your left hand menu. You’ll have the option to add a new redirect immediately via the empty text fields.
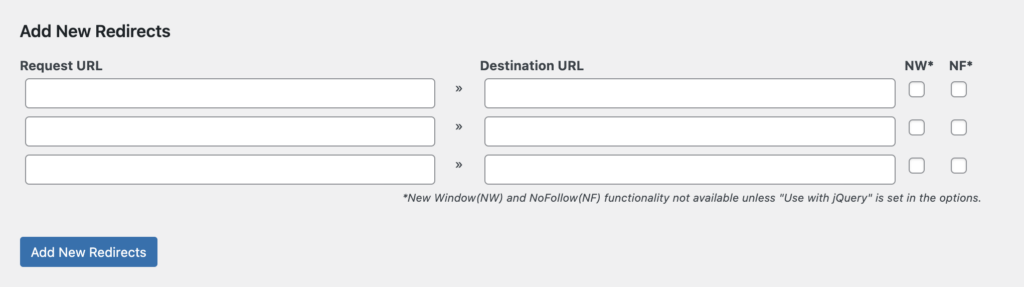
The Request URL is your old URL + the Desintation URL is your new one. It’s that easy.
The NW (new window) + NF (no follow) options impact how your users experience the redirect. Only check these if you know that you want a new window to be opened or the nofollow rule to be obeyed.
From there, add your new redirects with the button + you’re all set!
Avoiding redirect issues
Before you go on a redirect creating spree, here are a few things to keep in mind.
You must direct traffic to a page that exists. When entering the URLs into your redirect, always think of the order that your visitors will see the pages – #1 = URL they type into their browser, #2 = URL they see in the end. And once you’re done creating your redirect, it’s a great idea to test it in a private browser window.
Some crazy long URLs can be avoided by changing the permalink directly in WordPress. If you’ve already posted + shared the article, you’ll want to use a redirect. But if you haven’t clicked publish yet, take a moment to see if you like the permalink. Is it descriptive? Is it SEO friendly? Will I be able to tweet about this or is the link itself 149 characters?