Keep this post open when you’re running updates because that’s the most common time for WordPress plugins to break. Whether it’s a slow server or tackling too many plugin updates at the same time, sometimes the update process times out (stalls) + files don’t fully load. When that happens, plugins don’t work as expected. That’s when you need to fix your broken WordPress plugin to get your site functional.
Step 1, disable the broken plugin
First, if you can see the plugin in your Installed Plugins list, you’re simply going to deactivate + then delete it. Don’t worry, removing a plugin does not remove the content you created with that plugin. That content is stored in the database, which we aren’t going to touch. Then jump to step 2.
Don’t see the plugin? You’ll follow a slightly nerdier protocol, but it’s pretty simple.
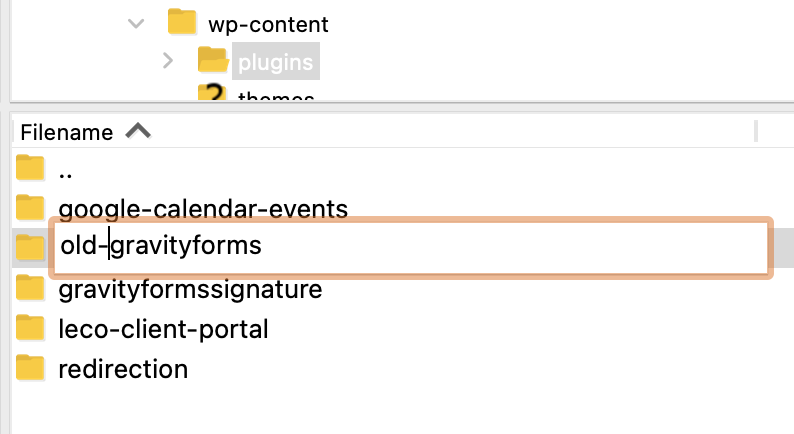
Using SFTP (or FTP which is the less secure version), you’re going to find the plugin folder + rename it. I like the extra step of renaming because it’s a safety net if something goes wrong. Open up your favorite SFTP app (mine is Filezilla) + connect to your site. Or use File Manager in your hosting account.
Find the plugin folder by going to wp-content > plugins. If you don’t see wp-content, you’ll likely need to open the public_html folder + then maybe your site name if you have multiple sites. Once you’ve tracked it down, right click on the folder or use the Edit option in File Manager to add a random word to the front of the folder name. Let’s say Gravity Forms was the issue, rename it old-gravityforms. I like old because it is a clear reference for which folder to delete, but the actual word choice doesn’t matter.

Why does this work?
Because the plugin is set to reference all files in a very specific folder name, by renaming that folder, the plugin is no longer recognized in WordPress. It will also allow you to install a new copy without any interference from “a folder existing with that name” type error. Speaking of…
Step 2, install a new copy of the plugin
Whether this is a paid plugin or free, you’ll need to install a fresh copy. If it’s free, in your site dashboard go to Plugins > Add New. Then search for the plugin name to install it. Click the button + move to step 3.
If you’re fixing a premium plugin, you’ll need to download a new copy from the support site where you purchased it. From the same Plugins > Add New area of your site, upload the zip file containing the plugin.
Step 3, test the fix of the broken WordPress plugin
After you’ve installed the clean copy of your plugin, it’s time to activate + test it out. Don’t forget to check your plugin license if you’re fixing a premium plugin. Sometimes this auto fills out because of the database info, but sometimes it needs to be re added.
Whatever this plugin did, check that it works. Afterall, you’re here to fix a broken WordPress plugin, not ignore it + hope it resolves on it’s own. If the issue was Gravity Forms, test your contact form or opt-in. If it was Yoast SEO, try editing your SEO on a new page or post (you can always change it back.) Once you’re sure it’s good to go, let’s wrap this up.
Step 4, delete the old plugin
This step only applies if you weren’t able to delete the plugin from your dashboard. The same way that you found the plugin folder to rename it in Step 1, you’re going to delete the folder that has “old” in the name. This will keep your plugin folder cleaner + avoid a security risk as your broken plugin isn’t receiving updates.
Quick Recap: How to fix a broken WordPress plugin
At the end of the day, all that’s needed to fix a broken WordPress plugin is 3-4 steps. And one of those is an extra step added for your protection.
- Disable the broken plugin
- Install a new copy of the plugin
- Test the plugin
- Delete the broken plugin files
Bookmark this post for a rainy day. I hope it’s one you never need to reference, but if you do, I’m stoked to be the one to help you + your site.
