When you’re ready to share your site with the world, it’s a great idea to give Google the heads up that a new site exists. Sure, you could wait for their bots to stumble upon it, but why not take charge + get your name out there sooner than later? Like Google Analytics, Search Console is a free service offered by Google that you can take advantage of for your blog + business. It helps you monitor + improve your site’s ranking in Google Search results — hence the name “Search Console.”
The other perk of telling Google about your WordPress site is that you’ll have a place to go if you need to gently nudge those bots to scan your site again. (This is a good step to take if you revamp your site content by adding/removing multiple pages.)
This only takes a few minutes to do + requires that you have a Google account (think gmail) + access to your domain registrar (where you bought your domain from).
1. Set up your Search Console account
The place that you keep in touch with Google about your website is called Search Console but was previously named Webmaster Tools. Both searches will get you there. Like many of their products, Search Console is tied to any Google account (typically gmail.) To get started, you’ll need to first log in with the account you want to use.
This is important if you have GSuite email for your website AND a personal gmail email address. Make sure you are signed into your business Google account.
- Head to the Search Console homepage + click the big blue “Start now” button at the top to sign in, if you aren’t already
That’s it. There’s 1 step to setting up your free account — logging in to a Google account that you already have. Of course, if you don’t have a Google account, you’ll need to create one.
2. Add your WordPress site
Once you have your free account, it’s time to add as many websites as your heart desires. We’ll start with one…
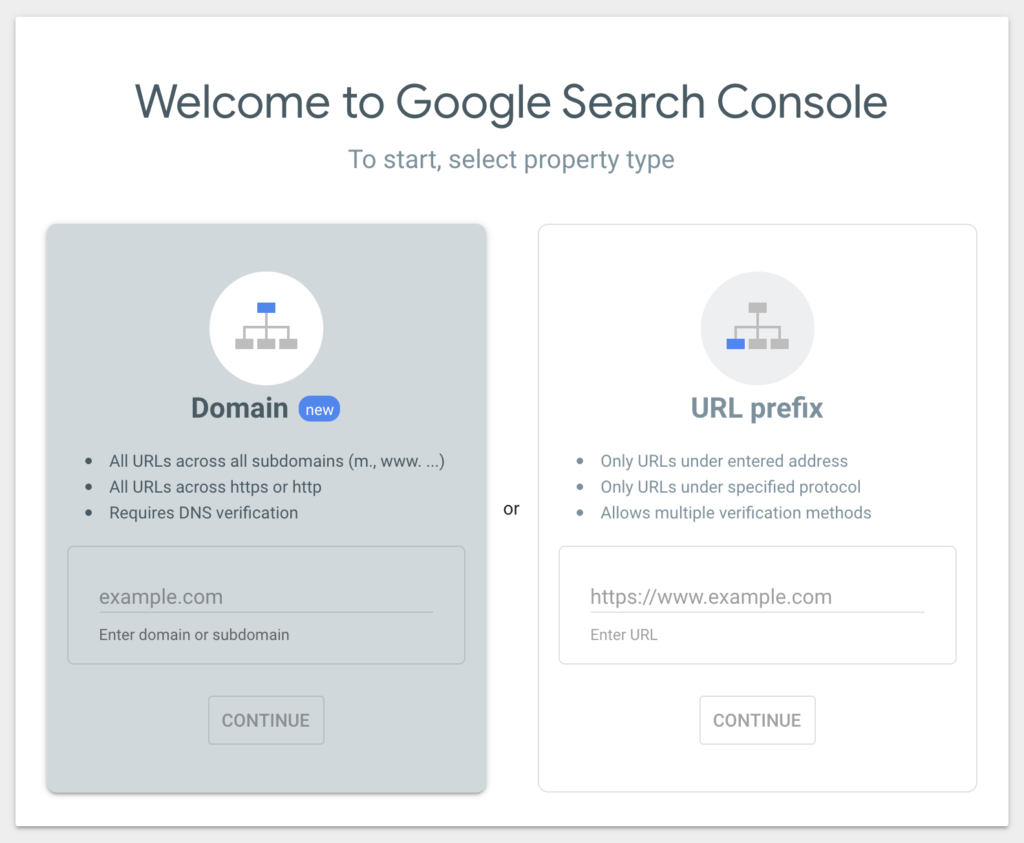
- Enter your domain in the box on the left — I recommend URL prefix only if you have multiple sites under the same domain. What does that mean? I have tinyblueorange.com + additional client sites like support.tinyblueorange.com.
- Click the continue button to start the verification process.
- Google will give you instructions for proving that you own the domain. These are a tad nerdy, but let’s break them down…
- Log into the place that you bought your domain from. Head to the DNS area (sometimes called Zone Editor or Advanced Zone Editor).
- Look for the “Add a Record” button or a plus sign of some kind. You’ll want to click that to add the TXT record that Search Console provided. That means the “type” is TXT and the “hostname” is @ — nerd shorthand for your domain name. “Content” is where you’ll enter the long gobbledygook that Search Console gave you on step 3.
- Click save, add record, whatever lingo your domain registrar uses to save your changes + head back to Search Console.
- Press the “Verify” button with the understanding that it may not work right away. For better + for worse, DNS changes can take hours to register on the world wide web. Don’t default to thinking you did it wrong.
What if it fails?
If your verification fails, leave the tab open + come back to it in 15 minutes. And if it fails again, check back tomorrow or later in the day by clicking the “Verify Later” button.
Does the idea of setting up a DNS record has you feeling less than great? Click the Alternate methods tab + select from those options. Verifying with Google Analytics is the easiest if you have GA already on your domain. The HTML file upload option is great too if you know how to use FTP.
3. Add a sitemap
My biggest recommendation for brand new Search Console accounts is to add a sitemap. This gives Google a better idea of what content you have, how often it is changing + which pages to pay attention to.
Click on Index > Sitemaps in the lefthand menu. Under “Add a new sitemap” you’ll want to use the link below, but with your domain instead of the example.
https://yourdomain.com/feed
WordPress automatically creates a sitemap for you at the destination / feed. As long as you don’t have a plugin that interferes with that, you can use this to set up your sitemap.
Type in the URL for your specific feed + click “Submit” to save the sitemap. If it’s successful, that’s all you have to do. If it fails, double check that you spelled everything right + don’t have any extra characters.
Now Google will use your sitemap to check on the status of your site + your site content. This is what will trigger alerts from Search Console for most users.
Getting Alerts
By default, Search Console will email you when there are issues with your website. Common issues include how your site displays on mobile devices, 404 + other page errors, spam from hackers.
This means you can “set it + forget it” by creating your account. Or you can head to your dashboard + poke around to get familiar with Google Search Console.