Once your WordPress site is utilizing Gutenberg, you might get a mild case of déjà vu as you build pages + posts. There may be some pieces of content that you repeat in multiple places. The great news is that you can save time by using Gutenberg reusable blocks. With a few clicks, you’ll have blocks that you can add anywhere on your site without having to copy the text, upload images, or add links. So let’s save you some time, shall we?
The 2 types of reusable blocks
First, we need to cover the 2 types of blocks that are great candidates for Gutenberg reusable blocks. There are the blocks that you repeat throughout the site + want to have the content display the same no matter where it appears. Examples of this would be your signature opt-in, author bio, or featured service listing.
The other type are those blocks that are oh-so-close to one another, but you might change some wording or the specific form. Examples would be other opt-ins or calls to action, team member bios, or your site’s hero image layout.
Both types can be saved as reusable blocks in Gutenberg. It’s simply a matter of knowing which one you’re working with so that you follow the necessary steps.
Blocks you’ll reuse as is
When you have a block that you want to repeat throughout your site with no changes to any piece, it’s time to save it. This way you can add the block with a button click the next time you need it. Open a page or post that has the block on it. Then click the 3 dots above your block + select “Add to Reusable Blocks” from the list. From here, give it a name + click the Save button. The name is purely for your reference, it is not visible on the front end of your site.

Adding your new Gutenberg reusable blocks to pages
When you’re ready to use the block you created, open up any page or post. Place your cursor where you want the block to appear. Click the + icon in the upper left corner + select “Reusable” to see your list of reusable blocks. Click on the block to add the content to your page or post.
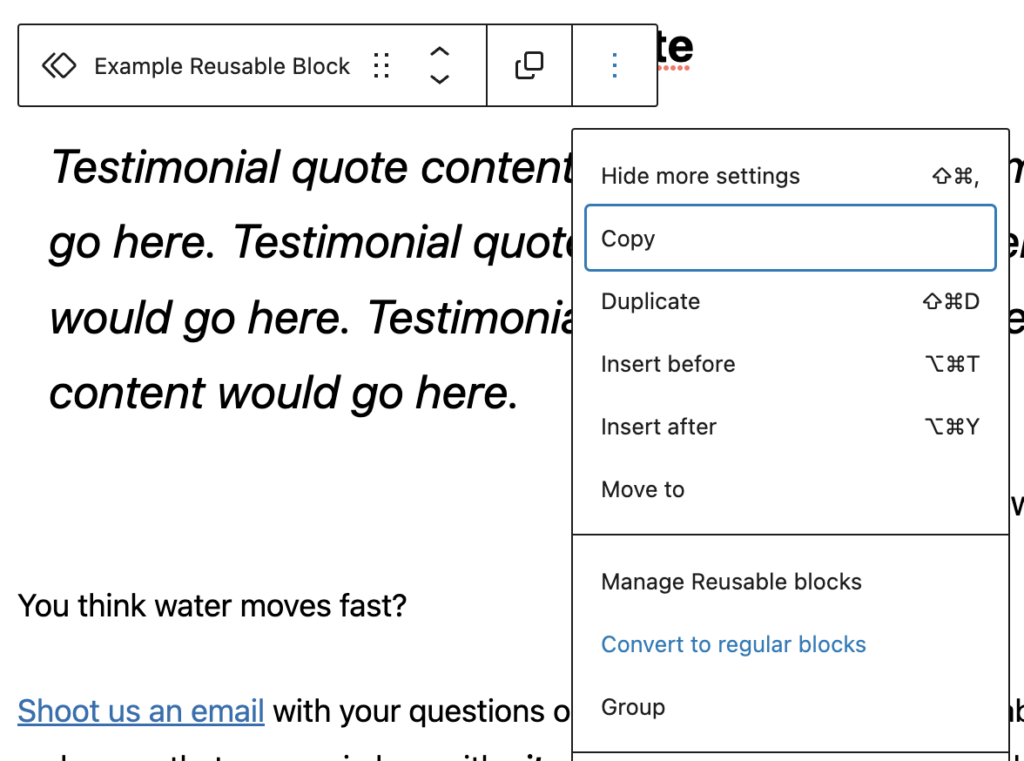
Note: If you click “Manage Reusable blocks” from this view, you can edit your blocks. The changes will show up anywhere those blocks are used.
Keep in mind that if you click the Edit button + make changes to the block on this page, it will impact every instance of this block on your site moving forward. That means, if you created the reusable block in Gutenberg after adding this same content to multiple pages, only the page where you saved the block + the ones that you added that saved block will be affected.
Want to make some changes without affecting other blocks? That’s where the second type of reusable blocks comes in.
Blocks with elements to change
Say you create a unique blockquote style but want to change out the specific quote. Or maybe you have a CTA style but different opt-in forms. That’s easy peasy!
First, you need to save the original Reusable Block using the same steps laid out above. But once you’ve added the block into your page or post, it’s time to make changes. Click the 3 dots to see “Convert to regular blocks” at the top of the page editor, click that. This will take the saved block + separate it from the Reusable Block.

From here, update the text, images, colors, etc. Those changes won’t impact what your other blocks look like. And if you accidentally create a reusable block that you no longer want, clicking “Manage Reusable blocks” from the list of available blocks will give you the option to delete it. Know that deleting from this page will remove content from your site. So tread carefully.
